Friday, October 19, 2007

Well, I've never been to Spain . . .

but I kinda like the music. Say the ladies are insane there, and they sure know how to use it . . .


Nothing like a little Three Dog Night to start the day! The insanely talented Cynthia Gordillo is from Spain and she sure knows how to use polymer clay. I believe she's taken a workshop recently with Dan Cormier, aka Captain Amazing, and I love to see how she's applying his methods to her own work. The softer and more feminine colors give her pieces a whole different look. Cynthia also has a shop on Etsy, although the last time I checked, she had nothing listed.

Thursday, October 18, 2007

RE: your DVD


Dear Judy,


After watching your new DVD from Page Sage, Millefiori Story, I have just one word to say - FABULOUS! Knowing me the way you do, you won't be surprised if I continue to blabber on though. Anyone working with polymer clay who's been intimidated by making canes is going to love this. You've made it so easy for them and even given them step-by-step projects so they can't say, "But what do I do with these canes after I've made them?" You might as well have just gone to their house and given them private instruction!

The 26 different canes are wonderful and I love the variety. You've even managed to include mica shift and a "dreaded" face cane. The gallery, of course, is incredibly lovely and I loved the bloopers, especially the fact that you actually belched on camera. Have you no shame?

As usual, Page Sage's sound quality, lighting, and camera angles, are of the highest caliber. A lot of hard work went into these 141 minutes and it certainly shows. I'm so excited for you and I know it's going to be a big success. I'll be recommending it to all my students.

Okay, enough gushing! Please deliver the lime green clock with the orange hands that I saw in the DVD to my house at your earliest convenience. It would look smashing in my studio!

See you soon,
Kim


Tuesday, October 16, 2007

Really, that's all I want . . .


It's been a bit of a dramatic year in the Cavender household.
After spending a long evening in the ER with my baby (in reality he's 6'1" and 14 years old) we're off to have a cast put on the hand he broke during his soccer game yesterday.
It may be a couple of days before I have time to write another entry, which will be a totally unbiased review of my good friend Judy Belcher's new DVD, Millefiori Story.
In the meantime, I will be visualizing myself in a tropical setting drinking an extra large frozen pina colada with a shot of frangelica floating gently on the top and a lovely paper umbrella
nestled beside my straw.
Care to join me?

Monday, October 15, 2007

Dye Jobs

Last week's post about china markers and Pebeo markers and paints stayed on my mind this weekend. There are countless ways to alter the color of clay and I thought it would be interesting to share a few others.
The book, Clay Techniques to Dye For, which I worked on with Judy Belcher, Leslie Blackord, Donna Kato, and Debbie Tlach is full of projects using inks, paints, and powders from Ranger.
This bracelet project from the book is a fun example of how you can turn black and white canes into ones with an unlimited color palette. Judy applied Ranger's archival re-inkers onto one side of the unbaked clay discs and left the original black and white colors on the other side to make this great reversible bracelet. According to Judy, this technique works best using pure colors of black and white. The grey tones that result from a black and white Skinner blend tend to muddy the colors of the inks.

I recently had the opportunity to meet the immensely talented Jeanne Rhea who's been doing some amazing work with inks. I could write a whole blog on this incredible lady but since she already has one of her own, I guess I'll settle for an occasional post. She has tons of information about her process so be sure to check her archives.


And finally, Ponsawan Sila has been "painting on clay" recently and has made some lovely cabs. You can check out some other examples of new work on her site.

Friday, October 12, 2007

Have you picked your pumpkin yet?


If not, this is the perfect weekend to do it! These cute little guys are from Cindy Riordan of CLB Creations. Look for her on Etsy too. Have a great fall weekend!

Thursday, October 11, 2007

China Markers

Several months ago, I noticed a post on a polymer clay newsgroup from Oklahoma's Belinda Birnbaum about using china markers to tint translucent polymer clay. I was intrigued since I really wasn't sure what a china marker was and even more intrigued when I saw her beautiful finished beads. Belinda, whose first passion is jewelry design, has worked with polymer clay for less than two years. She was doing some experimentation with colored pencils and picked up one of the china markers (aka a grease pencil) by mistake. She "scribbled" on unconditioned translucent clay and mixed the color in during the conditioning process. I loved the results that she got and wrote to her for permission to post her discovery here.
While I was waiting for a reply from her yesterday, I went to my local craft store looking for china markers and purchased what I thought Belinda had used to make her beads. After talking to her again, it was obvious that I had not made a wise shopping decision. The pens I bought were Pebeo Vitrea 160, actually meant for painting glass and crystal. You can see how I thought I was buying china markers, right? My first thought was to return them. But I decided to follow Belinda's lead and do some experimentation. If it didn't work out, I would coerce my boys into using them to decorate a gift for their grandmother. I spent a few minutes yesterday evening with an old translucent cane and the two markers I bought and here are my sample chips.

I used a small brush to apply the expressed green ink to a translucent cane slice, let it dry (just took a couple of minutes), and then burnished it, ink side down, onto another piece of clay. You can also see an unpainted slice at the top. I placed a painted cane slice onto gold leaf to see if the color was transparent enough to allow the leaf to show through. It was. I used a ball stylus to scribble on a piece of white clay and then encased it with translucent.

So, maybe my shopping mistake has some possibilities. There's still much to explore. If anyone else has worked with these pens or the Pebeo paints and would like to share their discoveries, please feel free to comment.

I want to thank Belinda for the inspiration to experiment with the Pebeo pens and for generously sharing her china marker discovery. I think both of these products are worth a closer look if you enjoy doing translucent layering and they may be compatible with liquid clay, as well. Perhaps you could use them to draw between layers of cured liquid. I hope you'll follow the wonderful example she's shown and not be afraid to experiment with products you already have. If it doesn't work out, learn from it, toss it (or not), and try something else. The only way we can grow as artists is to be fierce (thank you, Tyra Banks!) in our dedication to learning as much as we can about the materials we work with. Don't spend all your time reading about it or talking about it. Get your hands dirty! And to clean them afterwards, Marla Frankenberg highly recommends this stuff.

Beans and Rice

They're not just for dinner anymore! Artists Shirley G. and Barb Fajardo have been literally thinking outside the box (pun intended). They've chosen to use organic-looking materials to showcase their wonderful polymer clay jewelry. Obviously, this type of background isn't suitable for everything, but, in these instances it was a wonderful choice. The next time you visit the grocery store, look around. There must be lots of other organic materials or food products that would provide a great display or photo backdrop for your work. I'm thinking I may have to buy a couple of bags of dried peas. Any other suggestions?

Wednesday, October 10, 2007

Peace, Harmony, and Balance . . .


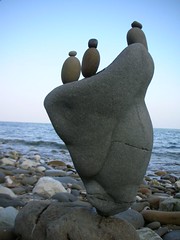
ValleParadiso3 12-06
Originally uploaded by rebranca46
These are the things that come to mind when I look at the photos of Renato Brancaleoni of Italy. The rock balancing pictures are so magical and delicate and I'm convinced that he must live in one of the most beautiful places on the planet. His photos will calm your soul. To see the sky, the sea, and the earth through the lens of his camera is a rejuvenating experience. I find myself humming Louis Armstrong's song "What a Wonderful World" every time I visit his site. Wishing you a peaceful, harmonious, and balanced day.

Tuesday, October 9, 2007

Just Call Me Wicked!


Before the plastic people take up their clay blades and march off into battle with the mud people, let's take another look at the post I made yesterday. I admit I have a bit of a wicked sense of humor. I read the posts from Vince and Barbara and I really did find them amusing and here's why.

Clay has been used to create art for thousands of years. Amazingly beautiful, refined and highly respected works of art. There are entire courses of study devoted to the art of ceramics and other types of clay at major universities all over the world. And then, we have polymer clay, less than one hundred years old, still in its infancy as far as art mediums go. There is no denying that prejudice against artwork made with a man-made plastic exists. And yes, the world would be a much better place if all biases and prejudice would simply vanish tomorrow morning. But realistically, we know that's not going to happen. What is happening though, is that polymer clay is slowly and steadily gaining some respect and recognition in the art world.

So, for thousands of years, all of the mud people weren't able to come up with a way to blend two different colors of clay together, or, if they did, they sure weren't sharing it with their buddies, were they? Then, along comes the fabulous, generous and unassuming Judith Skinner, who not only shakes up the brand-new world of polymer clay but figures out something that all of these clay artists couldn't seem to find a way to do. Hence the title of my earlier post, "Judith Skinner, take a Bow!". It would have been nice to see Vince and Barbara give credit to her for the technique but the fact that ceramic artists (with some pretty impressive credentials, btw) are learning from polymer clay artists is a wonderful testament to what Judith and so many other talented people working in our medium have managed to accomplish.

Does it sting a bit to know that polymer clay is looked at by some people with a bit of disdain? Sure it does. And my imaginary response to them was simply my wicked sense of humor that I called upon to ease a bit of that sting. Hopefully, this will just motivate all of us to work a little harder to make the best art that we can and maybe one morning in the future, we'll wake up and find the prejudices really have vanished.

And just so you don't think ALL clay artists have these biases, if you have a copy of the winter 2003 issue of Polymer Cafe, be sure to check out the article titled "What is Fine Craft?" by my very talented and wonderful friend Dick McGee. It seems like the perfect time to revisit this subject.

Eye Candy


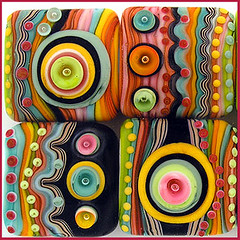
green pink orange gallery
Originally uploaded by
Michal S.
Israel's Michal Silberberg does incredibly beautiful glass work. Her color combinations sing and her patterns are perfection. What wonderful inspiration for polymer clay artists. Be sure to check her Flickr site for more eye candy than you can handle.

Monday, October 8, 2007

Judith Skinner, Take a Bow!

These are actual unedited posts I found on an online message board dealing with that "other" clay. I found them pretty amusing and decided to compose a little imaginary reply of my own.

From Vince-

I certainly have nothing against polymer clay, as long as people realize they are working with plastic. That is fine, and it is remarkable stuff. But I like to see people accomplish similar things with porcelain. The polymer clay websites are wonderful resources. Those people are obsessed, and they do an incredible amount of experimentation in order to come up with ways to outdo other polymer clay artists. By perusing these websites I have learned quite a few great techniques applicable to real colored clay work. One of the most exciting is the technique for creating clayloaves piece of clay that makes an even transition from light to dark or from one color to another. I can't explain it here, but you can find it at the polymer clay websites. I have been doing colored clay work seriously for almost twenty years, and that was a technique that had eluded me. It was a good discovery.


From Barbara-

Boy how I agree with you. I had my mind blown by really studying one of the ploymer clay books in Borders. Wow, I said. Some of these are really neat to apply to our clays. (Note the proprietary "our"). I've been having a ball applying the polymer clay people's techniques to potter's clays. I have purchased two of their books for our clay studio and have been teaching many of the techniques in our studio. Specifically: The precise line lend using backgammon points of several different color clays is fabulouso. The gradual blending of two different clays is great on southwestrn style squat high shoulder pots. Some people are using the cane technique for faces and landscape scenes out of colored clays to inlay into a pot. Also big (8")canes are quite ineresting for pots and wall hangings. Etc. etc. It's really worth a look at one of these books the next time you're at Borders or B&N. Hope you all have fun.

Dear Vince and Barbara,
So glad the polymer clay community was able to help you out. BTW, that gradual and even transition from dark to light clay is called a Skinner blend, named for Judith Skinner who originated the technique. If you need any more original ideas, just let us know. We're a pretty generous and innovative group of people who are happy to help beginners, even if they work with mud instead of plastic. Keep up the good work and be sure to look for us at your next gallery show.

Sparking Your Creativity


I love to read books of all kinds. I recently purchased an interesting little book by Jim Krause, who is also the author of The Color Index, an invaluable guide to choosing colors for your work. Creative Sparks is full of interesting exercises and observations to inspire creativity and it really encourages you to think about the WHOLE artistic process. Although a lot of the concepts were not unfamiliar to me, I enjoyed reading Krause's take on creativity.
Here's a little blurb from the book to whet your appetite: "All artists start from the same point: the point where nothing IS and something soon will BE. The difference between artists and their art lies in how they choose to fill the void, alter the state of things and rearrange raw matter. Everything matters: every element, every relationship between elements, every placement, every stylistic choice, every color, every word. Everything we add to or take away from our artwork, both physical and conceptual, either builds upon or undermines our final achievement."

Take nothing for granted during the creative process and remember that even the smallest of details DO matter.

Speaking of creativity, I just spent a few days in Raleigh, NC with a lot of very creative ladies. A big thank you to the Capital Area Polymer Clay Guild for their hospitality and their enthusiasm. It was wonderful to spend time with such a talented group of clayers! You each brought so much positive energy and a great sense of humor to class with you and it was an honor to meet you all.

Sunday, October 7, 2007

Mistakes Were Made


Time for another trashy trading card already! Thanks to Lisa Clarke for very kindly pointing out that those cool headpins I blogged about last week had been pulled off the Fire Mountain website due to the fact that they may contain lead. It didn't take me long to step right into a big pile of crap, did it? I LOVE blogging! Anyone want to buy some pendants, cheap?

Wednesday, October 3, 2007

What Color is Your Soul Painted?

Here's a quick and interesting quiz you can take to find out what color your soul is painted. Honestly, I've never given much thought to the color of my soul. Not surprisingly, here are my results:
I'm grateful my soul wasn't black! What color is yours?

Yet Another Wise Shopping Decision

First, let me begin with the "trashy trading cards". A couple of years ago I started making these cards. About 50 cards later, I realized I was possessed (much more serious than being obsessed) so I made myself put them away. Some of them (the ones that are not too trashy for an innocent blog) may pop up here from time to time.
The real reason for this post is a wise shopping decision I recently made. These headpins have an enamel coating and love the oven. They come in a large variety of colors as well so I decided to try an assortment. I've found a few uses for them so far but I'm sure there's even more to discover. I had some great silver bails that I wanted to use with pendants but the long tube that goes across the top was hollow and I didn't like the looks of the empty holes on either end. So, I cut off the headpins and glued them in place for a more finished look. Here are two other pendants where I used different headpin colors that were compatible with my clay colors. If you enlarge the photo, you can see an olive green set on one and a pale blue set on the other. I've also made a few pieces using the headpins as a design element.
Spending money - I do it so well!
No new posts till next week. I'm off to Raleigh, NC for a teaching gig.
Edited to add: Okay, I couldn't resist. But the one about the color of your soul is really the last one!

Tuesday, October 2, 2007

Red Pendant


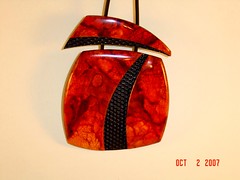
Red pendant
Originally uploaded by pcbysusan
Susan Turney gives credit to Donna Kato and Nan Roche for being the inspiration behind some of her newest work. This pendant is just exquisite. The shape, the color, the depth, and the finishing are spot on.

If this doesn't put you in the mood to work with a fall palette, then nothing will.

In a Mercury Pocket


In a Mercury pocket
Originally uploaded by Lumase

Luigi Masella is an amazing photographer and a poet as well. I'm in love with his images. Each and every one is special and magical.

This one makes me want to run out and buy a kiln and take up metal clay in the worst way.

You can find more inspiration and purchase prints of his work here.

Monday, October 1, 2007

Autumn Inspiration


The leaves are changing color, there's a crispness in the air, and I'm feeling inspired. These beads are done with the technique I'm teaching at the Las Vegas Clay Carnival. I've strung them with silver spacer beads, oh-rings from Fire Mountain, and picture jasper donuts.

I've been stringing my newer bracelets on thick elastic cord and it's not easy to find spacer beads with holes large enough to accomodate the elastic. The oh-rings are great and come in a variety of colors and sizes.

Here's a trick I like to use to create a more finished piece. The elastic only comes in black or white so I use alcohol inks and rubber stamp re-inkers to dye the white elastic a color that coordinates with my bracelet beads. I just apply it with a sponge or brush.

Check out my Flickr site for new work coming soon.

Sanding and Buffing

There's always much discussion online and at retreats and classes about the best way to finish your work. I love a matte finish on some things but there are some techniques that demand a shine. How best to achieve it? At the risk of being called nasty names, I have to say that I've never been a fan of acrylic finishes. Yes, I know some surface elements may need to be protected with some sort of finish and I'm not opposed to that. But, I've only seen a handful of pieces coated with acrylic finishes like Future or Varathane that didn't look as if they were coated with Future or Varathane. I've tried it myself and found it close to impossible to get a flawless finish with these methods.
For those who have asked, here's my method for a shiny finish with lots of depth. First of all, if you put something in the oven that isn't perfect or close to perfect, that's exactly how it's going to come out of the oven. There is no oven genie. Don't be in a hurry to bake anything. That's one of the biggest mistakes I made when I first started working with clay and I've had lots of students who say the same thing. Take your time to make it right before you bake. I can promise you that spending hours trying to sand a lumpy pendant or bead is no fun and it will NEVER look right no matter how much sanding you do.
I sand with 400, 600, and sometimes 800 grit sandpaper. Before I move past the 400 grit, I run my fingers over the entire surface of the piece. If I feel any sort of scratch or roughness, it's not time to move on to the 600 grit. When the piece feels like silk, I go to 600 and then 800 grit. It usually takes me no more than 5 or 10 minutes to sand a piece through all three grits.
After rinsing and drying the sanded clay, it's time to buff. I use a small Foredom buffer designed for jewelers with a variable speed. Again, no more than 5 to 10 minutes to buff a piece and I'm done. That's it. No drips, no mess, no bubbling, no drying time involved, no re-baking and no worrying about the finish peeling or chipping. Plus, the depth that you get from buffing is pretty amazing! If only I were a better photographer . . .

Going Dotty!


One of the best classes I've ever taken was a workshop with the marvelous Marla Frankenberg. When I first saw her dotty canes a few years ago during a demo at Shrinemont, I just loved them. And now, she's doing much more with them. They've become her trademark and she's incorporated them into most of her newest work. They create such wonderful movement and flow through all of her jewelry.

I'm excited to hear that one of her newest workshop offerings is based on caning with dots. The possibilities for this technique seem endless to me.

Marla will be teaching a week-long workshop at Arrowmont October 21- 27. For more info on what you'll learn, go to http://www.arrowmont.org/
You can email Marla for upcoming class information
and see more of her wonderful work here.